Welcome one more week to a quick tutorial on UE4!
As we said last week, we are going to try and change every now and then from 3DS Max to UE4, to mix things up a little. And right now we are going to take a look at the game engine, and more specifically to some of the problems I encountered when trying to light the scene. Ready for it? Let’s go!
Today’s topic is going to be about lighting, and about a curious incident I came across when trying to light one of my scenes. Take a look at the image below:
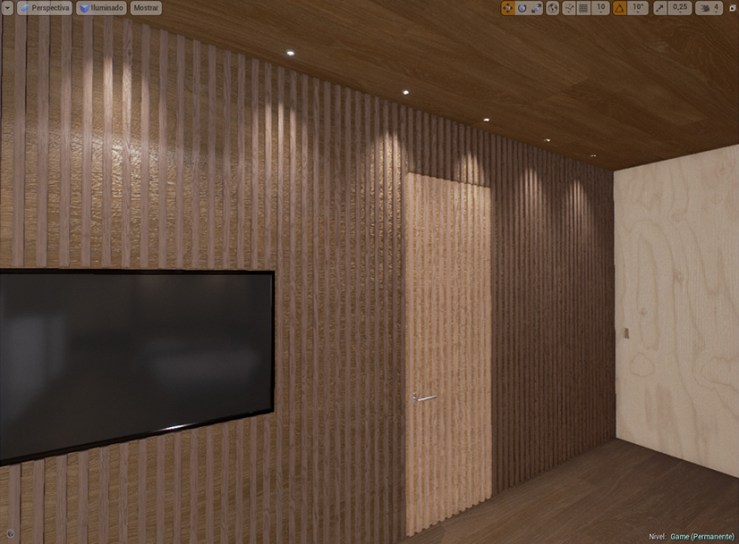
See the difference in the lighting? Those two assets – the wall and the door – share the same materials and textures – their UVs are even scaled in the same way -, so theoretically we should be looking at similar results in regards of the overall look. So where’s the difference? In order to answer that question, we have to take a quick look at how Unreal approaches light calculations.
First of all, we have to understand that there are different elements that affect the lighting of our scene. The overall look really depends on many different elements, such as the types of light that we have, the different settings that can be applied to a given geometry, the materials… For this particular example, what is messing up the scene is the fact that we have an element that is not supposed to be moving around in mid game – the wall – and another one than will be rotating – the door. The way Unreal approaches lighting is different for each of these types of game objects, and so is the final visual result. Luckily, there´s a way to match up all of the options and make everything look nice, but let´s first go through all of the different lighting options to understand them a little bit more.
Lighting options!
1/ Static meshes:
First of all, we have two different sets of game objects – static meshes or movable ones. The first type are those that are not going to change throughout the game, either in position, rotation or in any other way. Since they stay in the same place, we have the ability to bake into them certain information so as to free up resources for the real time computations that the engine carries out. Some shadows or reflections can be dealt with in this way.
2/ Movable objects:
The second group of game meshes are the movable ones, those that are inherently more dynamic and can change in multiple ways. For our example, the door we mentioned before would need to me movable, since we are going to open and close it throughout the game.
Now that we know the basic differences, let´s take a further look to the lighting section of the game engine. In there we´ll be able to find a couple of options that will make our door look the way we intended, just like the rest of the wall.
3/ Lighting options


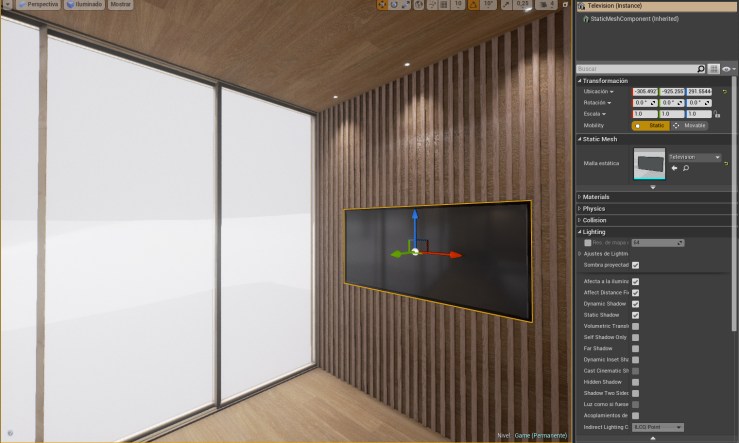
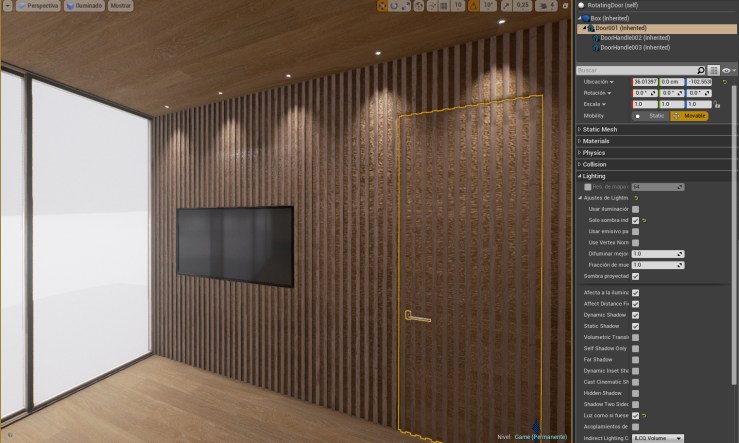
Above these lines, you can find two pictures that are the exact same settings used for the static TV screen and the movable door we saw before. The difference between them is that the ‘mobility’ setting is set to static for the TV, and movable for the door. Regardless, we want to solve the issue of the difference in lighting we saw at the beginning. How do we tackle that?
The solution can be seen in the second image of the two above – if you scroll down the lighting tab properties, you can see that the movable door has an extra ticked setting from the TV. Apologies for my game engine being in Spanish, but that tick means ‘Light as if it were static’. That tells the engine to light the object as if it were a static mesh, much like the wall surrounding that door. So there you go, that´s the way to have a movable object with the same lighting as the static meshes around it!
Activating that option can solve little issues like that one, at the cost of not having dynamic lighting on the door – but for what we want, it gets the job done. Next week, we´ll take another look at some other lighting issues. It´s an overall important topic, since the final appearance of the scene will rely a lot on how the lighting looks like. But until then, have a great time and hope this helped!
Cheers!
